Showing posts with label Furniture Refinishing. Show all posts
Showing posts with label Furniture Refinishing. Show all posts
Red Dresser with hand painted typography
Tuesday, September 1, 2015
I love three drawer dressers. And I love red.
I painted this with Plaster Paint in Red Ruby.
I chose Ivory Lace for the font and then a dark glaze over the entire dresser before sealing it with liquid wax.
The client picked out the hardware from Hobby Lobby.
The original hardware was pulls so there were two holes for each pull. We filled the holes (twice) and sanded them down so that the holes weren't visible any longer.
I think it turned out super pretty. It's going to be picked up next week and will be a statement piece for someone's big, southern porch.
We are trying to finish up orders so we can close the shop and get ready for vacation. We only take BIG vacations every so often and this is a big one for us. I think Eddie and I are as excited as the kids. Ha!
I will share more about that soon. I just wanted to remind you guys about our end of the month flash sale on FB, Three Mango Seeds. Sale starts at 6pm CST and is usually over at 7pm CST. Plus, the Etsy shop, mangoseedmarketplace, will close September 4th and will reopen a few weeks after that. We are trying to get holiday signs ready and listed as well as prepare for a couple of fall shows. Life is busy.
Interested in hearing more about Plaster Paint? We are retailers. Get in touch with us via Facebook.
Thanks for stopping by and I hope you all have a wonderful Tuesday!
Tuesday, August 18, 2015
We needed a good table on wheels for shows. I think this one fits the bill.
I love the vintage industrial castor wheels that we found on Etsy.
Eddie created a herringbone pattern on top that turned out great.
We'll be able to use it in our booth as a display or use it at local shows with crates and baskets.
Upcoming shows for the fall are The Flying Pig Outdoor Market in October and Affair of the Heart in November. See you there!
Tuesday, August 11, 2015
Eddie has been building these custom tables for a little while now and people seem to love them.
The client shares with us the measurements that will best fit their space. He builds it and I paint it. We're a good team.
This particular table was painted with a pretty shade of white, slightly distressed and sealed. The top was stained with a special mix of Provincial and Jacobean.
We will be delivering it one day this week to it's forever home. I Can't wait.
The wood grain turned out so pretty on this one.
If you want to know more about custom built furniture, please email us at threemangoseeds@yahoo.com. Thanks for stopping by!
Tuesday, August 4, 2015
We've had this dresser stacked in our garage along with some other furniture for a little over a year now. My goal this weekend was to begin finishing some of these furniture projects so we can get our garage organized.
I am super happy. I finished two furniture projects this weekend.
The color / brand paint we used was Plaster Paint Toasted Marshmallow then glazed. We left the *original* hardware naturally aged.
This dresser came with a thick glass top, that was slightly over-sized but we still used it.
Eddie built a small shelf that would be great for a basket or turn it into a component shelf with a flat screen on top.
Loving how it turned out. It will be offered for sale at the boutique soon. Thanks for stopping by!
Wednesday, June 10, 2015
This Farmhouse inspired table would be perfect as a changing table, knick knack display or a television console with baskets on the shelf to hide all your movies.
We've had a few requests for raw, unfinished furniture so the customer can finish it themselves.
The top is gorgeous.
If you are local (no shipping) and are interested, please shoot us an email with what you are looking for. We can normally adjust the dimensions to fit your custom needs. Please give us at least a 2 - 3 week turnaround time. Our email is threemangoseeds@yahoo.com.
Wednesday, March 25, 2015
We were at our local auction some time back and an old antique bed frame came up for bidding. Eddie snatched it right up. Here's the transformation.
He used the footboard to create the sides, a rail for the front and pine for the bench seat.
I created a custom mix of paint using Toasted Marshmallow & Espresso Plaster Paint and applied one half hazard base coat.
I also created a custom stain mix using Jacobean & Provincial wood stain for the bench seat.
After the basecoat was dry I painted it with Sweet Cream. See that faux brick? Check back next week and I'll show you what we did with that.
Next, I distressed & added the WELCOME typography on the back of the bench and began filling it in.
Finished it off with liquid sealer in matte.
And here it is in it's new home...
We've done so many signs lately that it was a nice break and FUN to do some furniture again!
Friday, November 9, 2012

We found the baskets at Lowe's. Looking at these pictures I wish I would've painted the pulls white. Easy fix.
I usually find all of my graphics from the Graphic's Fairy. I painted this one on top. If the future buyer doesn't like it then I can always cover it up.
Here's a little close-up of the distressing. I love how you can see the blue shining through.
There has been a new antique shop open up in town called, The Brocante Market. These little side tables are on display there and hopefully soon someone will come along and scoop them up.
{UPDATE: SOLD}
Thanks for stopping by!

Friday, August 17, 2012
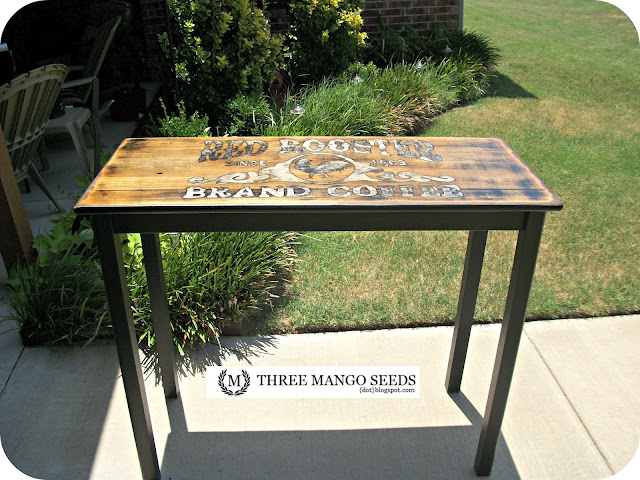
First off I have to say that this table was my husband's & youngest daugher's creation. I did very little here and was worried that the direction they were going wasn't going to be a popular one. I WAS WRONG! The idea they had turned out pretty spectacular and SOLD in two days! I won't be doubting them again.
Here is how it all went down... We started with this little plain jane table.
Gave it a few coats of black paint...
We all thought that the odd height made it unusable anywhere other than a kitchen. Perfect for a small kitchen island used for prepping. Keeping that in mind we came up with this for the top.
I love that she is wanting to learn, however we turned her loose with paint pens instead of brushes! Although, she surprised us with a pretty steady hand so maybe she'll do just fine with the brushes. LOL
Now, here's we were all started to have our own opinions. I thought we were done! A few more coats of sealer, tags and a stop at the shop! However, I was quickly outnumbered and this is what they decided it needed.
I guess they were right because it was gone FAST! They are pretty proud of themselves.

{UPDATE 10/2012} I don't use stencils because I like to enlarge or decrease images on a whim! However, you can buy a Red Rooster stencil here.
Subscribe to:
Posts (Atom)


.png)


.png)


