Proverbs Side Table

Tuesday, November 29, 2011


I found a little but heavy side table several weeks ago but haven't had the time or the energy to get something done with it.  I came across this verse in my bible and it just clicked that this is what I wanted on top.  Seems like I absolutely cannot redo a piece of furniture without painting some type of typography on it.  Is that a bad thing?
This is how it looked in the beginning.  Pretty, but kinda bleh.
I don't think anyone else wanted it because the legs were all wobbly.  All I had to do was crank these back down and now I can stand on it with no worries.  This little table is heavy & sturdy.

Painted bottom & sanded the top.
Dark stained top, wax & a little distressing on the bottom.
Isn't the detail on this so pretty?
Get'n the words on...
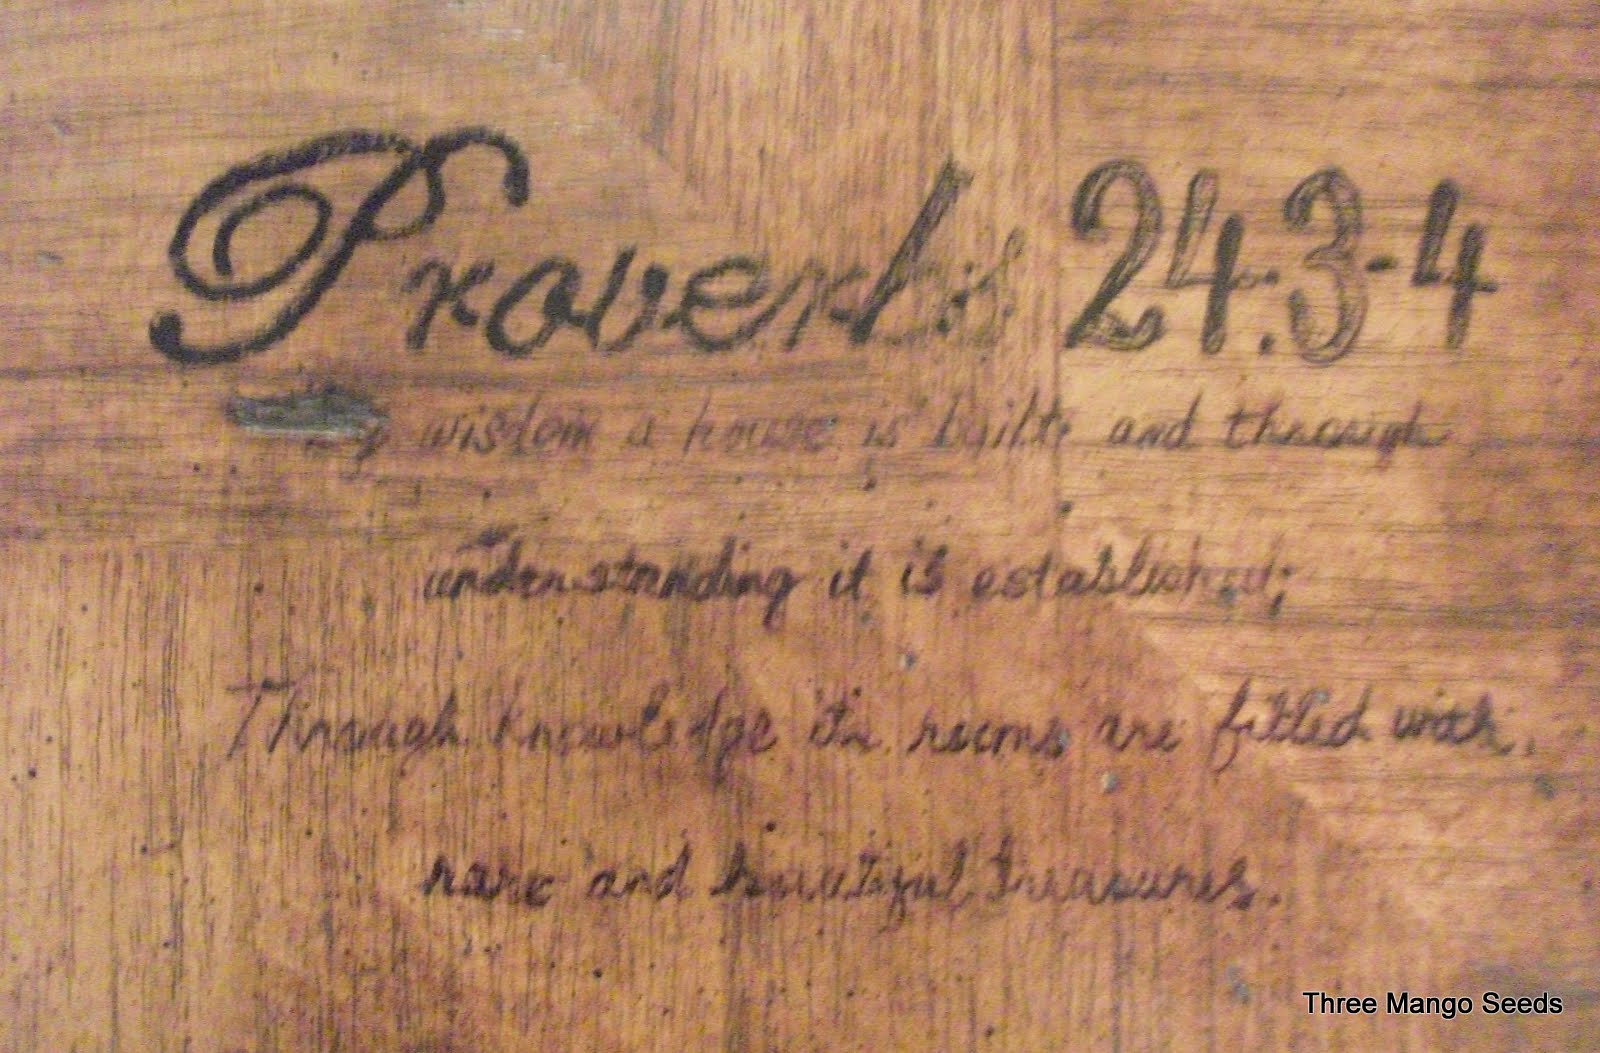
I know they look like they are barely there.  I wanted that look on this one.  I told you I really like things that are old.  To me, this looks almost worn off and I like it.  It's not for everybody, but especially on this piece, it suites me.


The Proverbs table is for sale.  

PS -- I have had a TON of emails asking how I transfer typography to furniture.  It's so easy.  I finally created a little tutorial for all ya'll so check back it'll be up soon. :)
Pin It

A Tip...

Saturday, November 26, 2011

Do you have a jacuzzi tub?
  
 I found a tip on cleaning your jets via Pinterest and wondered if it really worked to keep all the black junk from sticking to the inside of your lines and finding their way into the bath water.
  

It works, it's easy & it's inexpensive.  Here's how I did it.

You will need:
Bleach
Cascade {powder}

1.  Fill your tub {past the jets} with HOT water, 1 cup bleach and 1 tablespoon of Cascade.  Put this in as your tub is filling up.

2. After your jacuzzi is full, turn on the jets for 15 minutes.  After the 15 minutes, I turned off the jets so I could clean around the nozzles.  I used a Q-tip to get all the way around them.

3.  Turn it off and drain your water.  Rinse out the tub.

4.  Fill your jacuzzi tub up again {just past the jets} with COLD water.  After your tub is full, let it run again for 15 minutes.  This will give your lines a good rinse.

5.  Let it drain and rinse out your tub.  

This really works!  I did this a couple of weeks ago and ran the jacuzzi today.  NO BLACK SCUM floating in the water!  Yay!  I didn't know how easy it was to clean out the lines until I found this tip on Pinterest so I thought I'd share it with all of you!


Love...

Monday, November 21, 2011

Today I'm dedicating my blog to my best friend!

I love him for so many reasons that I couldn't possibly list them all.  Here is just a few...
I can be myself when I'm with him.
He loves Jesus.
He has faith in me.
He is the one who holds the key to my heart.
He makes me feel safe
He is a wonderful dad.
I can't imagine life without him.
We've been together through thick & thin and each valley has made us stronger as a couple and as parents.  He is 41 today.  

Happy Birthday Sweetheart!

New Name Sign Design

Monday, November 14, 2011

I made this sign for the sweetest woman at our kids school.  She surprised me with this...
She made it!  Isn't it gorgeous?!  I wish I had jewelry talent, but I do not.  She sent this home in an envelope with one of my kids yesterday.  So I sent the above sign back in this morning. LOL
Hope she likes it!
I think I may add these to my shop...they are 6 x 18 are will be $15.

Updated Lamp Post

Thursday, November 10, 2011

We've been in our house now almost four years.  It really doesn't seem like it's been that long.  We are always doing little projects here and there and constantly painting.  Even when it's a new house it's never quite complete.


But one thing that was looking a little "old" was our garage doors and lamp posts.  Last weekend I decided to give them a quick makeover before it got to cold to tend to them.

When we first put these up they were oil rubbed bronze, now look at them all faded and grayish.


 My hubby wanted me to wait on him so he could take these babies down for me so that I wouldn't get paint on the brick?  What?!  I decided against waiting. ;)  I just put some paper back in behind it and taped it all up.  Took the glass globes off and gave them a quick wash and was ready to spray.


I used blue painter's tape to get my globes ready for paint.  I even already had a can of Rustoleum oil rubbed bronze on hand from some furniture hardware I had previously painted.  Gave all three globes a quick once over and was loving how great they already looked.


  I wish I would have gotten a view of the garage doors/lamp posts before I started painting.  The difference was really impressive, even though I thought they looked fine before.  It's funny how when you look at something everyday you don't see how badly something can need attention.  Here's a better picture of a finished lamp post.


 Looks new huh?!  They really needed an update.  I guess the moral here is don't be afraid to take a can of spray paint to your house! 

Plus, by the time hubby got home and saw the "after" he wasn't upset at all that I didn't wait on him! LOL Especially since the project was completely done & cleaned up by the time he got home.


Enter your email
to have THREE MANGO SEEDS posts sent to your inbox.

Enter your email address:

Delivered by FeedBurner


The GRAPHICS FAIRY

Friday, November 4, 2011

Karen over at The Graphics Fairy featured my dresser/sideboard makeover.  Karen's blog is one of the very first site's I started reading so I can't begin to tell you how happy I am that she featured me.

Her blog is FULL of vintage graphics as well as amazing idea's.  I get a lot of inspiration there and have created a "to do" file just from her site.  My only problem is finding the time to do them. Ha!
Anyway, thanks KAREN, you totally made my day!

Better After Feature

Thursday, November 3, 2011

Just a quick SHOUT OUT to Lindsey over at Better After for featuring my Restored Sideboard Makeover.

THANK YOU LINDSEY!

If you've never {can't imagine} visited her blog, it's a must do!  She features ah-mazing before & after's.  Have a great project that your really proud of?  Send her a link to your post and you just might be featured on Better After.
 
site design by designer blogs